Sowing Wildflower Seed
Pre-Germination Techniques
Natives for a Meadow Garden
Some of my favorite annual wildflowers are the gilias, and the whole genus is pretty much deer-proof. I like globe gilia (Gilia capitata) with its round heads of small blue flowers; these grow wild on Mt. Burdell. I haven’t seen bird’s-eye gilia (Gilia tricolor) in the wild in Marin, but I sure love it in my garden. It does fine in the ground or in containers, and the intricate coloring of the delicate flowers is a true marvel. Even more marvelous is the turquoise pollen!
Wildflowers often seed into my gravel pathways; this seems to be an ideal situation for them. Since I still need to be able to walk the pathways, I let them grow just at the edges, and carefully dig nice specimens from the middle of the path to move or pot up; the rest go to my compost piles. A hori-hori knife is the perfect tool for this; it reaches far down enough, and then with just a little wiggling, loosens up the soil so that the seedlings can be lifted out with the root ball intact. Don’t try to untangle the roots, just plant them as you dig them. To thin out seedlings, use a fine sharp blade and cut the stems of the weaker seedlings at ground level. This lessens the disturbance to the remaining seedlings.
Low, wide containers are fine for growing annual wildflowers. If the containers are strategically placed they can be an aid in spreading wildflowers to other areas of the garden. You could even create a mini-meadow if you have a large enough container!
A combination of the following species will help you get a meadow started:
GRASSES – Idaho fescue (Festuca idahoensis) and purple needlegrass (Stipa or Nasella pulchra).The grass seed will germinate in about 10 days to two weeks and will look like tiny blades of grass right from the start. The blades will grow larger and more profuse, becoming more bunch-like in about two to three months.
PERENNIALS – Yarrow (Achillea millefolium), narrow-leaf mule ears (Wyethia angustifolia), California helianthella (Helianthella californica), and blue-eyed grass (Sisyrinchium bellum). Yarrow germinates in about ten days, and within a month you can see the ferny true leaves forming in a rosette. Narrow-leaf mule ears and California helianthella may take a month or longer to germinate. Look for rosettes of linear leaves close to the ground. Blue-eyed grass germinates more slowly, sometimes taking six to eight weeks before showing as tiny blue-green blades that are flatter than grass blades.
BULBS – Blue dicks (Dichelostemma capitatum), and soap lilies (Chlorogalum pomeridianum) both germinate in about a month or so and, being monocots, will look a bit like two little blades of grass, but wider. Blue dicks may bloom in a year, but the soap lilies need to grow for several years before blooming starts.
ANNUALS – Most annual wildflowers germinate within a week to ten days, and will bloom within a few months. California poppies (Eschscholzia californica) are straplike leaves to start, and then become a divided blue-green true leaf. Globe gilia (Gilia capitata) soon grows a small, green ferny leaf, and white tarweed (Hemizonia congesta ssp. luzulifolia) grows for months as a low rosette of distinctly silvery-green leaves before starting to bloom in late summer.
Transplanting Tips
If you are working with old seed you can do a simple viability test before sowing. Use a damp paper towel, lay ten seeds onto one-half of the towel, fold the other half over, and keep moist. Watch for the development of the radicle; the number of seeds that germinate will give you a rough percentage of viabilty of your seed.
Fill your containers with the seed starting mix to within about one half inch of the top, and moisten it thoroughly. Press it down in the containers to eliminate air pockets. The soil mix should be very solidly packed into the container; this is really counter-intuitive, but the seed and soil need to be almost ‘as one’.
If you are sowing multiple species in one seed flat you can separate them with a bamboo stake. Label each different species, and make sure that all the species sown together have compatible germination requirements.
A rule of thumb is to plant a seed no deeper that twice its diameter.
The size of the seed equates, in part, to its food reserve; which equates to the distance it can grow before being able to produce its own food. Furrows can be created for large seed; medium seeds can be sown on top of the soil mix. Then cover the soil mix with dry vermiculite to the top of the container, and pack it all down again before watering it in.
When working with really tiny seeds (and these can be like dust) cover the packed in soil with a thin layer of vermiculite, and then sprinkle the seed on top of that on top of the vermiculite; the seeds will settle into the tiny spaces between particles of vermiculite. Then press it all down thoroughly to ensure good seed to soil contact, and water it in.
If you are setting up a seed flat with a cover, under lights and with a heating mat; you are also creating ideal conditions for molds and mildew. After you have watered in your seeds, sprinkle cinnamon on top! Cinnamon is an anti- fungal, and will prevent molds and mildews from forming in the warm, moist conditions. Some growers also use finely milled spaghnum moss as a top-dressing on the seed flat to help prevent damping-off.
Water your seed flat every day, the soil medium needs to be kept moist, but be careful to avoid soggy conditions. I keep bottles of water around, and allow the time to out-gas the chlorine that is present in all city water. I use a bottle-top sprinkler, and always water seeds and seedlings with water at ambient temperatures. Then watch and wait for the excitement of germination ! Once you’ve started the process you will have to pay attention to your seeds every day.
RECORD KEEPING
It is important to label the seeds you have sown in each container. The label can simply state the common or botanical name, and the date sown. It makes a lot of sense to keep a notebook with more extensive records of what you’re propagating, and the results; so that you have a reference of successes and failures to guide future propagation projects.
Noting the following helps to create a body of knowledge:
- Botanical name, and when and how the seed was acquired note if the seed is old – and if you did a viability test
- Date when the seed was sown
- Conditions the seed has been sown in;
soil mix ( if it’s different than your standard )
inside or outside ?
lid or covering over the seed flat ?
bottom heat ?
gro-light ? and if so how many hours of light ? - Note the date of the first germination
note whether it is scant, just one or two seedlings
note if germination occurs over a period of time - Note the date when the first true leaves appear
- Note the date if and when you thin the seedlings
- Note the dates of progressive transplants
note the numbers of seedlings you transplant
TRANSPLANTING
Once all the seeds in the container have germinated, and have the first pair of true leaves, you can decide to thin them, and let them grow in the original container for a while longer, or to transplant them into individual containers. If you are going to thin them, choose the healthiest looking seedlings, and snip the others off at the soil line with a pair of fine scissors. Pulling the unwanted seedlings out can damage the root system of your chosen seedling.
Roots and shoots need to grow in harmony, and transplanting is most effective when there is obviously vigorous growth. When you’re going to transplant, choose the smallest container that the seedling will fit into without over-crowding the root system. Two inch pots are a fine size for many seedlings; use the appropriate soil mix, and once the seedlings are settled and visibly growing, you can use a liquid fertilizer if you want to. Setting two inch pots on a capillary mat really helps to maintain constant and even moisture for the seedling. You can saturate the mat, and cut down on the watering at the surface.
Always work in the shade when transplanting, and take great care not to leave the roots exposed to the air. Fine hair roots die within minutes when exposed to drying air. Use a knife or skewer to prick out the seedlings, and handle them very gently by the true leaves.
Never handle a seedling by the stem; this is the life-line, and too easy to damage. Transplant the seedling to the same depth it grew at originally. Be sure to gently, but firmly, pack the soil in around the root system to avoid air pockets. Water very soon after transplanting, and use a really gentle spray. The water should be at the ambient temperature.
Try not to change the conditions the seedling was growing in too dramatically all at once. If the seeds were started on a heat mat, try to gradually transition them off it. You can start by reducing the number of hours that the heat mat is on, and then eventually remove it, and transition the seedlings to the outdoors in a protected place.
Keep newly transplanted seedlings in a shady place for at least a few days. You may need to protect them from predation by snails and slugs, and possibly also rodents and birds. Cloud cover fabric, laid loosely over the seedlings, but tucked securely under the flat or pots works well as long as you’re sure that the water also passes through to the soil. When the seedlings have ‘settled in’, and once they are up to a 4” pot size, you can gradually move them into the appropriate exposure for the species. I like to use a cold frame to help transition the seedlings I start indoors. Regular fertilization will help assure good growth, and with some species you may need to pinch back the growing tips to create a better form.
If a seedling lingers, a mycorrhizal innoculant might help to stimulate vigorous growth. This is especially true of many of our native plants, which have complex symbiotic relationships with soil organisms. A bit of good garden soil can also provide innoculants.
Seedlings need to be ‘hardened off’ before being planted outside in the garden. Do this by moving them outside during the day for gradually longer periods over the course of about a week. Towards the end of that period of time, given that the weather is mild, they can be left out overnight, and then planted into the ground.
Some tender seedlings will benefit from ‘ hot-caps’ at night for the first week or so in the garden. Other seedlings may need a shade cover for the first few days until they establish, especially if the weather is very hot. To protect them from snails and slugs, surround the seedlings with crushed oyster shell; the surface is too rough for the snails and slugs to crawl over. The oyster shell is also a source of calcium that can be worked into the soil.
The whole process requires just a little bit of attention every day, but your efforts will be richly rewarded with a garden full of beautiful, and sometimes, rare and unusual plants ! Utilize references for propagation tips on species that are new to you, and check your own records to use past experiences as a guide.
If you get infected by the ‘propagation bug’ you will want to experiment; developing your own most suitable methods for successful plant propagation. Do not be afraid to try a new species or a different approach; there is a depth of knowledge and many potential plants to be gained, and sometimes just a little effort lost!
Creating a Meadow Garden
The days are still warm and we’re all hoping, once again, that this will be an El Niño year with ample rainfall and a good snow pack in the Sierras. The days are noticeably shorter, and the evenings are much cooler. The shorter day length is a cue to many native plants and seeds that the season of growth in California is arriving; now we just need the rains!
Seeds also clearly represent the end of one cycle of life and the beginning of another. The only species that I’m still collecting seeds from is the lovely little yellow-flowered tarweed (Hemizonia congesta ssp. lutescens). I’ll be collecting almost daily from various plants in various areas right through most of October, or until the rainy season really starts. Once the weather is cool and consistently moist, it’s no longer a good idea to gather seed.
I’m into the third year of creating a meadow area within my garden; it gets sun all day long in one part and late afternoon sun in another. Purple needlegrass (Nasella or Stipa pulchra) is establishing in the sunny half, and California fescue (Festuca californica) is establishing in the shadier half. I’ve been weeding out non-native annual grasses throughout the years in this area and topdressing with a light application of all-green compost.
If the rains don’t arrive soon, I’ll put a sprinkler on for half an hour or so to make the soil a little more workable. Then, using a rake, I’ll loosen up the soil a bit, just down to about two inches, before I spread more seed. I like to use a mix of annual and perennial wildflowers species, and sometimes I customize my seed mix. I always mix the seeds with river sand (NOT playbox or beach sand, which contain salts) before spreading it. This allows me to see where I’ve sown the seed. Once that is done, I walk all over the space to make sure there’s good seed-to-soil contact.
Then the seeded area gets a covering of light mulch. I’ll use a wildflower “hay” in the sunny area, and make another “hay” of perennial bunchgrass stems for the shadier side, then water again. Since I have lots and lots of birds foraging in the garden, I will cover the whole area with very light “cloud” or row-cover fabric. It lets water and light through, and should be laid on fairly loosely to allow the growth of seedlings underneath. The edges can be tacked down with earth staples, or held down with rocks.
It’s important to let the seedlings develop for a while with protection because, come spring, the Sparrows really like to nibble on tender young greens; there needs to be enough plant to withstand this minor predation. Another way to protect the seeds and new seedlings is to lay some light branches over the whole area. Sparrows can’t really do their “double scratch” in the confined spaces between the twiggy stuff; just be sure to lift off the branches before the seedlings are so large that they get tangled in the protective cover.
As the meadow planting matures in areas, I switch to a more permanent gravel mulch, and will let nature take its course—I will simply be the editor in my garden. Wildflowers often seed into my gravel pathways. This seems to be an ideal situation for them but since I still need to be able to walk the pathways, I let them grow just at the edges, and carefully dig nice specimens from the middle of the path to move or pot up; the rest go to my compost piles. A hori-hori knife is the perfect tool for this; it reaches far down enough, and then with just a little wiggling, loosens up the soil so that the seedlings can be lifted out with the root ball intact.
Helping Seeds Sprout
Some seeds have built-in mechanisms that prevent germination until ideal conditions are met. Even when perfect conditions are met, some of the ‘seed bank’ of a species will not germinate. They will wait, often camouflaged in the duff, as an insurance policy against a possibly disastrous growing season.
When planning to propagate try to think like nature. First, pay careful attention to the conditions that the parent plant was growing in; the duff, the soil, the water supply, the climate and seasonality. Then think about what happens to those seeds in the wild. Think about the natural conditioning processes that occur to plants, and their seed in their native environment; and try to duplicate these natural processes.
Would it make any sense for the seed to germinate right away, or will conditions be better for growth in another season? Seeds do not necessarily ‘hit the ground’ at the best time for them to germinate. Some seeds may be programmed to germinate right away, while others need to be ‘dry-conditioned’, (which is what we’re doing while cleaning and storing). This is a great time to think about the environmental conditions of the parent plant. What changing conditions are the seeds subjected to while they wait for optimum conditions for germination? Many seed coats have germination inhibitors that require a certain amount of rainfall to de-activate. But, seeds from plants in arid areas have to germinate fast at the moment of transition from a dry summer to a mild, wet winter. Other seeds need to experience a snow pack, and then a thawing as the days lengthen.
Are the seeds encased in fruits that are food for some creature? These types of seed need this ‘prior experience’ in order to germinate! Scarification is the term used to describe methods that damage the seed coat, thereby allowing moisture into the seed, and starting the germination process. With some seeds this is only part of the pre-germination process. In nature it can happen by fire, by abrasion from gravel, or by animals. Fleshy fruits actually inhibit the germination of the seeds within until the flesh is washed away. These fruits are meant to be passed through the digestive tract of an animal, and etched by the acids in the digestive tract. The scarified seeds, now minus the flesh, are then passed out, complete with their own supply of organic fertilizer! Seeds are often distributed over a wide area, and away from the parent plant by birds and other creatures. Many chaparral plants, and closed-cone pines, need fires to scarify their seeds, and also to create the ideal seed bed and availability of light.
For example: a foraging squirrel may damage the seed coat of a pine nut, and then because of the abundance of seeds available in each cone, overlook it. The seed may then get partially buried in the duff, and, over the course of the next season, be exposed to changing temperatures, perhaps a snow pack, and changing day lengths. Photoperiodism will help to trigger germination if and when conditions are optimum for growth.
Stratification is the term used to describe the effect that weather, changing temperatures, and day length have on a seed store. The seeds of summer annuals are programmed to go through changing day lengths, and receive a certain amount of rain before germinating. Desert wildflowers, which germinate during a very short monsoon season, must experience a season of very hot temperatures first. Seeds of high mountain plants need to experience a snow pack, and then moist, warming weather and lengthening days before germinating. Seeds of some plants simply need to ‘ripen’ further after detaching from the parent plant, and before germinating.
REPLICATING SOME NATURAL CONDITIONING PROCESSES
Scarification
Soak seeds in boiling water for thermal shock.
Soak seeds in very strong, dark, black coffee to mimic the digestives acids.
With large seeds use a knife to nick off a tiny bit of the seed coat.
Line a jar with sandpaper, place your seeds within, and shake.
Fill a jar with grit, and seeds, and shake to scarify.
Create a charate (burned materials) to topdress the seed flat.
Smoke pads are available from some suppliers,
or you can try using a smoker (such as those used by beekeepers)
Smoked fish can be soaked, and the water used as a drench !
Stratification
Soak the seed in hot water, or in black coffee.
Mix the seed with a moistened medium, and refrigerate for two to three months. Be sure to label the seed. Keep it moist, and watch for the growth of the radicle, potting into a soil mix soon after growth starts.
Some seeds respond to warm and moist soil conditions which is easy to duplicate with a propagation mat and moist soil mix. Seeds can be fooled into thinking it’s spring with a gro-light set for fourteen hours a day.
For the seeds of many California perennial plants: Prepare the seed flats or trays in late summer, or early fall. Make sure your medium is moist, carefully sow and label your seeds, and then water them in. Cover the seed flat with cloud-cover fabric to protect against predators, and find a protected, shady place outdoors for it. If the rainy season comes as expected, you only need to wait and watch. Some seeds will take months to germinate, so be patient. Once you see germination starting you must make sure that the seedlings receive water regularly. Transplant them when the first set of true leaves has formed.
Experiment with different methods! Divide the seeds of one species into different batches – and use a different approach with each batch. Keep records to determine which method yields the best results.
Some Natural Types of Seed Pre-Conditioning
Whenever I’m out collecting I always keep it foremost in my mind that seeds are food for all sorts of insects and other invertebrates, for birds, rodents and other mammals, and food for humans!
When I gather toyon berries in December, I take just a handful from each cluster, and go to several different shrubs to collect. I want to make sure there’s still plenty of food for the birds; the red berries are a magnet for cedar waxwings, robins, house finches, band-tailed pigeons and the mockingbirds. By February, there are no more berries on the toyon.
The native peoples also gathered toyon berries, which they cooked on hot rocks until the skins bubbled, then the berries were mashed and eaten. I imagine that the seeds contained within each berry were also mashed and eaten. That’s not the case when a bird eats the berry; only the flesh is digested, leaving the seeds to be expelled with the feces.
This is a common form of “pre-conditioning” for many seeds contained within berries; the seed is now ready to germinate if conditions are good where it happens to land. I notice lots of toyon seedlings all over my garden, very often right next to the birdbath! I leave some of these seedlings if they are in a suitable place for a large shrub to grow on to maturity. The deer will browse toyon, so the seedling and even the mature plant needs some protection.
In the wild, toyon grows in a chaparral community, together with scrub oaks, ceanothus, coffeeberry, and silk-tassel bush. Often the chaparral is so dense and hillsides so steep that the deer can’t get to the plant. In my oak woodland, toyon shrubs will grow with a broad “skirt” of badly nibbled growth, until finally a leader shoots up in the middle where the deer can’t reach it. One toyon in my woodland is a handsome thirty-foot tree!
Seedlings that can’t stay where they germinated are carefully dug up, using my hori-hori knife to gently tease out the whole taproot. In the nursery, we grow these seedlings on in a long, skinny tube style pot (called a d-pot) for about six months, until they’re big enough for a tree pot, which allows room for a nice straight, long root system to develop.
As a plant propagator, I try to duplicate this natural pre-conditioning to get a better germination rate with the seeds. I try to think like nature, but I also do some research to see what other growers do, and then I might try several methods to find out which yields better results.
I separated seed from toyon berries in December, and then stored the clean, dry seed until February. Other propagators recommend a cool water soak for just an hour before sowing the seed; I did this with half my seed. Before I sowed the other half, I soaked them in hot, black coffee, to duplicate the effect of digestive acids. The pots are labeled; it will be interesting to see if there are distinct advantages to one method or the other.
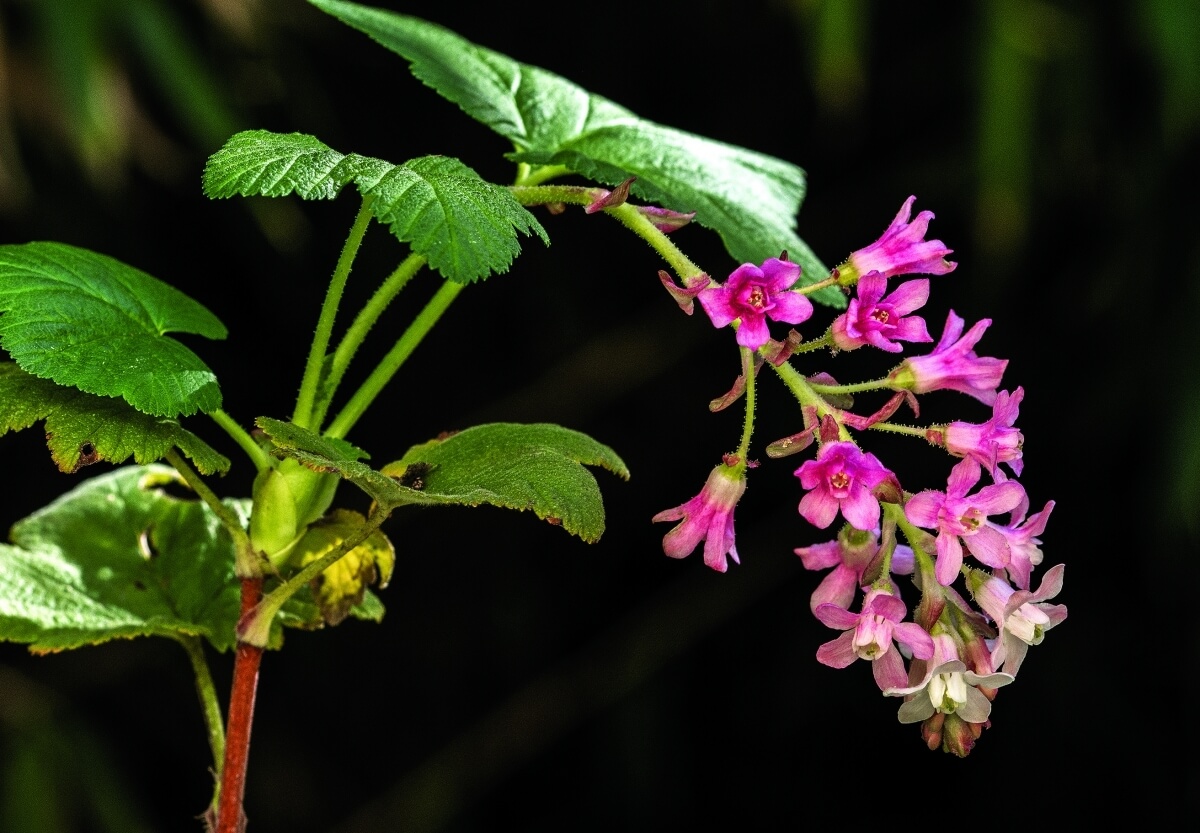
Pink-flowering currant in bloom. Photo: Tom Christensen
Another important source of berries for birdlife are the native currants. These currants are edible though not very sweet; the native peoples harvested the berries and mashed them with dried meats and fats to produce a sort of power bar!
I grow several species of native currants in my garden, and usually propagate the pink-flowering currant (Ribes sanguineum var. glutinosum) from tip cuttings taken in May. Last fall I gathered berries and soaked them to get the seed. While I was cleaning them I noticed that the water they were soaking in had a delightful scent, and mild, sweet taste. Next year I plan to try making a jelly from the berries!
Meanwhile, we’re off to a good start with ribes sanguineum from seed; freshly cleaned seed was sowed on November 23rd, and by early January germination had begun. By the end of January almost all the seeds had germinated, and true leaves were forming on tiny seedlings. We’ll let them grow on a bit, undisturbed, and plan to pot them up by the end of February. In a year’s time, they will have become beautiful gallon-size shrubs.